Ignition Systems
The purpose of the ignition system is to create a spark that will ignite the fuel-air mixture in the cylinder of an engine. It must do this at exactly the right instant and do it at the rate of up to several thousand times per minute for each cylinder in the engine. If the timing of that spark is off by a small fraction of a second, the engine will run poorly or not run at all. To learn more about how an engine works, go to our Short Course on Automobile Engines.
The ignition system sends an extremely high voltage to the spark plug in each cylinder when the piston is at the top of its compression stroke. The tip of each spark plug contains a gap that the voltage must jump across in order to reach the ground. That is where the spark occurs.
The voltage that is available to the spark plug is somewhere between 20,000 volts and 50,000 volts or better. The job of the ignition system is to produce that high voltage from a 12-volt source and get it to each cylinder in a specific order, at exactly the right time.
Let’s see how this is done.
The ignition system has two tasks to perform. First, it must create a voltage high enough (20,000+) to arc across the gap of a spark plug, thus creating a spark strong enough to ignite the air/fuel mixture for combustion. Second, it must control the timing of that the spark so it occurs at the exact right time and sends it to the correct cylinder.
The ignition system is divided into two sections, the primary circuit, and the secondary circuit. The low voltage primary circuit operates at battery voltage (12 to 14.5 volts) and is responsible for generating the signal to fire the spark plug at the exact right time and sending that signal to the ignition coil. The ignition coil is the component that converts the 12-volt signal into the high 20,000+ volt charge. Once the voltage is stepped up, it goes to the secondary circuit which then directs the charge to the correct spark plug at the right time.
The Basics
Before we begin this discussion, let’s talk a bit about electricity in general. I know that this is basic stuff, but there was a time that you didn’t know about this and there are people who need to know the basics so that they could make sense of what follows.
All automobiles work on DC or Direct Current. This means that current moves in one direction, from the positive battery terminal to the negative battery terminal. In the case of the automobile, the negative battery terminal is connected by a heavy cable directly to the body and the engine block of the vehicle. The body and any metal component in contact with it are called the ground. This means that a circuit that needs to send current back to the negative side of the battery can be connected to any part of the vehicle’s metal body or the metal engine block.
A good example to see how this works is the headlight circuit. The headlight circuit consists of a wire that goes from the positive battery terminal to the headlight switch. Another wire goes from the headlight switch to one of two terminals on the headlamp bulb. Finally, a third wire goes from a second terminal on the bulb to the metal body of the car. When you switch the headlights on, you are connecting the wire from the battery with the wire to the headlamps allowing battery current to go directly to the headlamp bulbs. Electricity passes through the filaments inside the bulb, then out the other wire to the metal body. From there, the current goes back to the negative terminal of the battery completing the circuit. Once the current is flowing through this circuit, the filament inside the headlamp gets hot and glows brightly. Let there be light.
Now, back to the ignition system. The basic principle of the electrical spark ignition system has not changed for over 75 years. What has changed is the method by which the spark is created and how it is distributed.
Currently, there are three distinct types of ignition systems, The Mechanical Ignition System was used prior to 1975. It was mechanical and electrical and used no electronics. By understanding these early systems, it will be easier to understand the new electronic and computer controlled ignition systems, so don’t skip over it. The Electronic Ignition System started finding its way to production vehicles during the early ’70s and became popular when better control and improved reliability became important with the advent of emission controls. Finally, the Distributorless Ignition System became available in the mid-’80s. This system was always computer controlled and contained no moving parts, so reliability was greatly improved. Most of these systems required no maintenance except replacing the spark plugs at intervals from 60,000 to over 100,000 miles.
Let’s take a detailed look at each system and see how they work.
The Mechanical Ignition System
(from the dawn of the automobile to 1974)
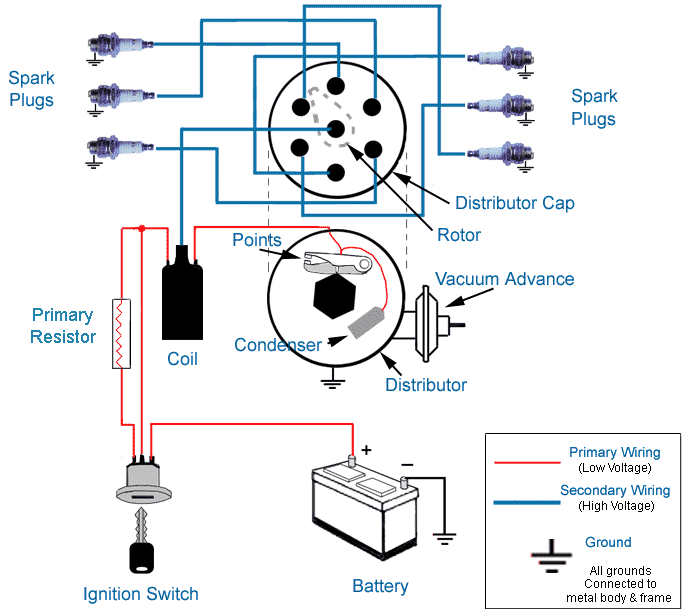
The distributor is the nerve center of the mechanical ignition system and has two tasks to perform. First, it is responsible for triggering the ignition coil to generate a spark at the precise instant that it is required (which varies depending on how fast the engine is turning and how much load it is under). Second, the distributor is responsible for directing that spark to the proper cylinder (which is why it is called a distributor)
The circuit that powers the ignition system is simple and straightforward. (see above) When you insert the key in the ignition switch and turn the key to the Run position, you are sending current from the battery through a wire directly to the positive (+) side of the ignition coil. Inside the coil is a series of copper windings that loop around the coil over a hundred times before exiting out the negative (-) side of the coil. From there, a wire takes this current over to the distributor and is connected to a special on/off switch, called the points. When the points are closed, this current goes directly to ground. When current flows from the ignition switch, through the windings in the coil, then to ground, it builds a strong magnetic field inside the coil.
The points are made up of a fixed contact point that is fastened to a plate inside the distributor, and a movable contact point mounted on the end of a spring-loaded arm. The movable point rides on a 4,6, or 8 lobe cam (depending on the number of cylinders in the engine) that is mounted on a rotating shaft inside the distributor. This distributor cam rotates in time with the engine, making one complete revolution for every two revolutions of the engine. As it rotates, the cam pushes the points open and closed. Every time the points open, the flow of current is interrupted through the coil, thereby collapsing the magnetic field and releasing a high voltage surge through the secondary coil windings. This voltage surge goes out the top of the coil and through the high-tension coil wire.
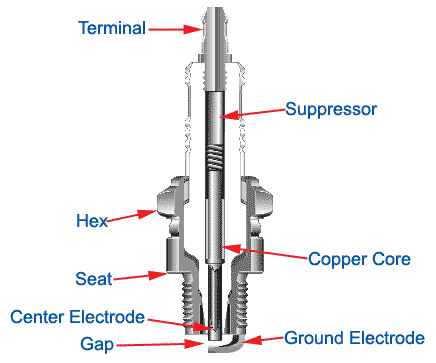
Now, we have the voltage necessary to fire the spark plug, but we still have to get it to the correct cylinder. The coil wire goes from the coil directly to the center of the distributor cap. Under the cap is a rotor that is mounted on top of the rotating shaft. The rotor has a metal strip on the top that is in constant contact with the center terminal of the distributor cap. It receives the high voltage surge from the coil wire and sends it to the other end of the rotor which rotates past each spark plug terminal inside the cap. As the rotor turns on the shaft, it sends the voltage to the correct spark plug wire, which in turn sends it to the spark plug. The voltage enters the spark plug at the terminal at the top and travels down the core until it reaches the tip. It then jumps across the gap at the tip of the spark plug, creating a spark suitable to ignite the fuel-air mixture inside that cylinder.
The description I just provided is the simplified version but should be helpful to visualize the process, but we left out a few things that make up this type of ignition system. For instance, we didn’t talk about the condenser that is connected to the points, nor did we talk about the system to advance the timing. Let’s take a look at each section and explore it in more detail.
The ignition switch.
There are two separate circuits that go from the ignition switch to the coil. One circuit runs through a resistor in order to step down the voltage about 15% in order to protect the points from premature wear. The other circuit sends full battery voltage to the coil. The only time this circuit is used is during cranking. Since the starter draws a considerable amount of current to crank the engine, additional voltage is needed to power the coil. So when the key is turned to the spring-loaded start position, the full battery voltage is used. As soon as the engine is running, the driver releases the key to the run position which directs current through the primary resistor to the coil.
On some vehicles, the primary resistor is mounted on the firewall and is easy to replace if it fails. On other vehicles, most notably vehicles manufactured by GM, the primary resistor is a special resistor wire and is bundled in the wiring harness with other wires, making it more difficult to replace, but also more durable.
The Distributor
When you remove the distributor cap from the top of the distributor, you will see the points and condenser. The condenser is a simple capacitor that can store a small amount of current. When the points begin to open, the current flowing through the points looks for an alternative path to ground. If the condenser were not there, it would try to jump across the gap of the points as they begin to open. If this were allowed to happen, the points would quickly burn up and you would hear heavy static on the car radio. To prevent this, the condenser acts like a path to ground. It really is not, but by the time the condenser is saturated, the points are too far apart for the small amount of voltage to jump across the wide point gap. Since the arcing across the opening points is eliminated, the points last longer and there is no static on the radio from point arcing.
The points require periodic adjustments in order to keep the engine running at peak efficiency. This is because there is a rubbing block on the points that are in contact with the cam and this rubbing block wears out over time changing the point gap. There are two ways that the points can be measured to see if they need an adjustment. One way is by measuring the gap between the open points when the rubbing block is on the high point of the cam. The other way is by measuring the dwell electrically. The dwell is the amount, in degrees of cam rotation, that the points stay closed.
On some vehicles, points are adjusted with the engine off and the distributor cap removed. A mechanic will loosen the fixed point and move it slightly, then retighten it in the correct position using a feeler gauge to measure the gap. On other vehicles, most notably GM cars, there is a window in the distributor where a mechanic can insert a tool and adjust the points using a dwell meter while the engine is running. Measuring dwell is much more accurate than setting the points with a feeler gauge.
Points have a life expectancy of about 10,000 miles at which time they have to be replaced. This is done during a routine major tune-up. During the tune-up, points, condenser, and the spark plugs are replaced, the timing is set and the carburetor is adjusted. In some cases, to keep the engine running efficiently, a minor tune-up would be performed at 5,000-mile increments to adjust the points and reset the timing.
Ignition Coil
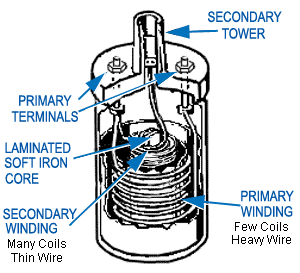
The ignition coil is nothing more than an electrical transformer. It contains both primary and secondary winding circuits. The coil primary winding contains 100 to 150 turns of heavy copper wire. This wire must be insulated so that the voltage does not jump from loop to loop, shorting it out. If this happened, it could not create the primary magnetic field that is required. The primary circuit wire goes into the coil through the positive terminal, loops around the primary windings, then exits through the negative terminal.
The coil secondary winding circuit contains 15,000 to 30,000 turns of fine copper wire, which also must be insulated from each other. The secondary windings sit inside the loops of the primary windings. To further increase the coils magnetic field the windings are wrapped around a soft iron core. To withstand the heat of the current flow, the coil is filled with oil which helps keep it cool.
The ignition coil is the heart of the ignition system. As current flows through the coil a strong magnetic field is built up. When the current is shut off, the collapse of this magnetic field to the secondary windings induces a high voltage which is released through the large center terminal. This voltage is then directed to the spark plugs through the distributor.
Ignition Timing
The timing is set by loosening a hold-down screw and rotating the body of the distributor. Since the spark is triggered at the exact instant that the points begin to open, rotating the distributor body (which the points are mounted on) will change the relationship between the position of the points and the position of the distributor cam, which is on the shaft that is geared to the engine rotation.
While setting the initial, or base timing is important, for an engine to run properly, the timing needs to change depending on the speed of the engine and the load that it is under. If we can move the plate that the points are mounted on, or we could change the position of the distributor cam in relation to the gear that drives it, we can alter the timing dynamically to suit the needs of the engine.
Why do we need the timing to advance when the engine runs faster?
When the spark plug fires in the combustion chamber, it ignites whatever fuel and air mixture is present at the tip of the spark plug. The fuel that surrounds the tip is ignited by the burning that was started by the spark plug, not by the spark itself. That flame front continues to expand outward at a specific speed that is always the same, regardless of engine speed. It does not begin to push the piston down until it fills the combustion chamber and has nowhere else to go. In order to maximize the amount of power generated, the spark plug must fire before the piston reaches the top of the cylinder so that the burning fuel is ready to push the piston down as soon as it is at the top of its travel. The faster the engine is spinning, the earlier we have to fire the plug to produce maximum power.
There are two mechanisms that allow the timing to change: Centrifugal Advance and Vacuum Advance.
Centrifugal Advance changes the timing in relation to the speed (RPM) of the engine. It uses a pair of weights that are connected to the spinning distributor shaft. These weights are hinged on one side to the lower part of the shaft and connected by a linkage to the upper shaft where the distributor cam is. The weights are held close to the shaft by a pair of springs. As the shaft spins faster, the weights are pulled out by centrifugal force against the spring pressure. The faster the shaft spins, the more they are pulled out. When the weights move out, it changes the alignment between the lower and upper shaft, causing the timing to advance.
Vacuum Advance works by changing the position of the points in relation to the distributor body. An engine produces vacuum while it is running with the throttle closed. In other words, your foot is off the gas pedal. In this configuration, there is very little fuel and air in the combustion chamber.
Vacuum advance uses a vacuum diaphragm connected to a link that can move the plate that the points are mounted on. By sending engine vacuum to the vacuum advance diaphragm, timing is advanced. On older cars, the vacuum that is used is a port vacuum, which is just above the throttle plate. With this setup, there is no vacuum present at the vacuum advance diaphragm while the throttle is closed. When the throttle is cracked open, the vacuum is sent to the vacuum advance, advancing the timing.
On early emission controlled vehicles, the manifold vacuum was used so that vacuum was present at the vacuum advance at idle in order to provide a longer burn time for the lean fuel mixtures on those engines. When the throttle was opened, the vacuum was reduced causing the timing to retard slightly. This was necessary because as the throttle opened, more fuel was added to the mixture reducing the need for excessive advance. Many of these early emission controlled cars had a vacuum advance with electrical components built into the advance unit to modify the timing under certain conditions.
Both Vacuum and Centrifugal advance systems worked together to extract the maximum efficiency from the engine. If either system was not functioning properly, both performance and fuel economy would suffer. Once computer controls were able to directly control the engine’s timing, vacuum and centrifugal advance mechanisms were no longer necessary and were eliminated.
Ignition Wires
These cables are designed to handle 20,000 to more than 50,000 volts, enough voltage to toss you across the room if you were to be exposed to it. The job of the spark plug wires is to get that enormous power to the spark plug without leaking out. Spark plug wires have to endure the heat of a running engine as well as the extreme changes in the weather. In order to do their job, spark plug wires are fairly thick, with most of that thickness devoted to insulation with a very thin conductor running down the center. Eventually, the insulation will succumb to the elements and the heat of the engine and begins to harden, crack, dry out, or otherwise break down. When that happens, they will not be able to deliver the necessary voltage to the spark plug and a misfire will occur. That is what is meant by “Not running on all cylinders”. To correct this problem, the spark plug wires would have to be replaced.
Spark plug wires are routed around the engine very carefully. Plastic clips are often used to keep the wires separated so that they do not touch together. This is not always necessary, especially when the wires are new, but as they age, they can begin to leak and crossfire on damp days causing hard starting or a rough running engine.
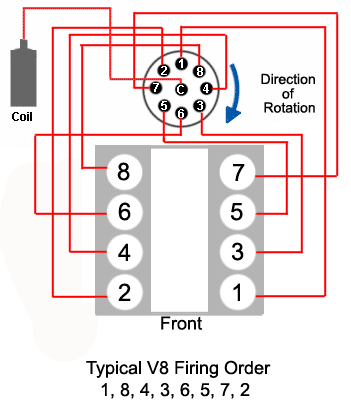
For instance, a popular V8 engine firing order is 1, 8, 4, 3, 6, 5, 7, 2. The cylinders are numbered from the front to the rear with cylinder #1 on the front-left of the engine. So the cylinders on the left side of the engine are numbered 1, 3, 5, 7 while the right side is numbered 2, 4, 6, 8. On some engines, the right bank is 1, 2, 3, 4 while the left bank is 5, 6, 7, 8. A repair manual will tell you the correct firing order and cylinder layout for a particular engine.
The next thing we need to know is what direction the distributor is rotating in, clockwise or counter-clockwise, and which terminal on the distributor cap that #1 cylinder is located. Once we have this information, we can begin routing the spark plug wires.
If the wires are installed incorrectly, the engine may backfire, or at the very least, not run on all cylinders. It is very important that the wires are installed correctly.
The Electronic Ignition System
(from 1970's to today)
This section will describe the main differences between the early point & condenser systems and the newer electronic systems. If you are not familiar with the way an ignition system works in general, I strongly recommend that you first read the previous sectionThe Mechanical Ignition System.
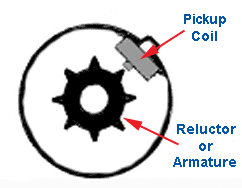
In the electronic ignition system, the points and condenser were replaced by electronics. On these systems, there were several methods used to replace the points and condenser in order to trigger the coil to fire. One method used a metal wheel with teeth, usually one for each cylinder. This is called an armature or reluctor. A magnetic pickup coil senses when a tooth passes and sends a signal to the control module to fire the coil.
Other systems used an electric eye with a shutter wheel to send a signal to the electronics that it was time to trigger the coil to fire. These systems still need to have the initial timing adjusted by rotating the distributor housing.
The advantage of this system, aside from the fact that it is maintenance free, is that the control module can handle much higher primary voltage than the mechanical points. Voltage can even be stepped up before sending it to the coil, so the coil can create a much hotter spark, on the order of 50,000 volts instead of 20,000 volts that is common with the mechanical systems. These systems only have a single wire from the ignition switch to the coil since a primary resistor is no longer needed.
On some vehicles, this control module was mounted inside the distributor where the points used to be mounted. On other designs, the control module was mounted outside the distributor with external wiring to connect it to the pickup coil. On many General Motors engines, the control module was inside the distributor and the coil was mounted on top of the distributor for a one-piece unitized ignition system. GM called it High Energy Ignition or HEI for short.
The higher voltage that these systems provided allow the use of a much wider gap on the spark plugs for a longer, fatter spark. This larger spark also allowed a leaner mixture for better fuel economy and still ensure a smooth running engine.
The early electronic systems had limited or no computing power, so timing still had to be set manually and there was still a centrifugal and vacuum advance built into the distributor.
On some of the later systems, the inside of the distributor is empty and all triggering is performed by a sensor that watches a notched wheel connected to either the crankshaft or the camshaft. These devices are called Crankshaft Position Sensor or Camshaft Position Sensor. In these systems, the job of the distributor is solely to distribute the spark to the correct cylinder through the distributor cap and rotor. The computer handles the timing and any timing advance necessary for the smooth running of the engine.
The Distributorless Ignition system
(from 1980's to today)
Newer automobiles have evolved from a mechanical system (distributor) to a completely solid state electronic system with no moving parts. These systems are completely controlled by the onboard computer. In place of the distributor, there are multiple coils that each serve one or two spark plugs. A typical 6 cylinder engine has 3 coils that are mounted together in a coil “pack”. A spark plug wire comes out of each side of the individual coil and goes to the appropriate spark plug. The coil fires both spark plugs at the same time. One spark plug fires on the compression stroke igniting the fuel-air mixture to produce power, while the other spark plug fires on the exhaust stroke and does nothing. On some vehicles, there is an individual coil for each cylinder mounted directly on top of the spark plug. This design completely eliminates the high tension spark plug wires for even better reliability. Most of these systems use spark plugs that are designed to last over 100,000 miles, which cuts down on maintenance costs.